Friday, August 21, 2015

Flying Ant Wings

My next My Little Pony custom is going to be Ant-Man with his flying ant "Antony." The custom is still a work in progress, but I have completed the biggest challenge of this project: creating the giant flying ant wings! It took a few tries, but I finally have a pair that will work. 


Creating the wings was a multi-step process. I decided on this method after attempting an older method I had used for fairy wings, a cellophane / trnasparency sandwich method that I used for set #1. The technique looked neat but that didn't look right for this application. 

For these, I used transparency film printed with the actual enlarged image of a flying ant's wings, then a thick gloss dimensional glue/medium on both sides, filling in the spaces between the veins. I then used the same medium to glue a length of black vinyl coated aluminum wire to the edge for stability and attachment purposes, and put a dot of black gloss "3-D" paint on the exposed end of the wire. Then I twisted the small wing and the big wing together, to make a full set of wings.

This is the dimensional glue I used. You can find it at Michael's or a similar store.
Another popular brand that you could try is Diamond Glaze.
 
The difficult part was getting the dimensional medium to self level and dry that way. The trick was to let each section of medium dry before filling in an adjoining section, as it seeks to form a solid mass and you will lose the vein effect of two adjoining areas meet (that was set #2.) The picture below illustrates how I filled in each section and let it dry (the clear parts are dry, the milky parts are just setting.)


 I put set #3 in my car to dry in the heat but oops, my dash is sloped so it pooled at the edges. Set # #4 was drying in the sun on my patio (indirect heat dramatically sped up the dry time which helps when there are so many areas to fill in and wait for before moving on.) Unfortunately, a stiff wind picked the sheet up and stuck it irreparably to my lawn chair. I was finally successful with this set when I worked on it on the patio while weighing it down with rocks! 

Here is the picture of ant wings that I used. It's actually a drawing, and I had to use photoshop to edit out the leg and dramatically darken the veins. the link for the photo (if you'd like to use it) is in the caption below the picture.


http://www.library.illinois.edu/prescons/services/ipm/images/ant_flying_2.JPG

If there are requests, I can make a more in-depth tutorial, but that is the basic process. Now, to finish the ant!

Wednesday, August 19, 2015

Cookie Cat Magnets!

Here are some sweet Cookie Cat magnets! These were inspired by the Cookie Cat ice cream treats that are Steven's favorite treat in Cartoon Network's popular cartoon Steven Universe.

These magnets look good enough to eat!

The magnets are lovingly hand sculpted with durable polymer clay. They are approximately 2" wide x 1.5" tall x 3/8" thick. They are three layers of ice cream cookie goodness!!! I will be bringing these along to the Vermont Comic Con, but they are also available for purchase now for interested parties.
Currently I have 8 of these, but will likely make more if there is a demand. Aren't they just the cutest? Here is the image they are based on:


If you'd like to know more please contact me in the comments, or fill out an order form here.

Wednesday, August 5, 2015

10 Little Kodama

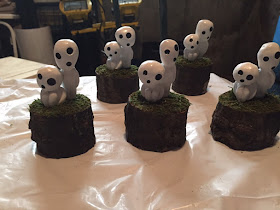
One of my most recent projects has been sculpting some adorable little kodama, inspired by the tree spirits in Hayao Miyazaki's animated masterpiece Princess Monokone. Who wouldn't be inspired by these guys?


I sculpted them with a blend of Sculpey Firm, Super Sculpey and Sculpey III over an aluminum armature. Alone they stand about 3" tall, and their bases are 2"-3". I made 5 this time around, each one with two little tree spirits.

kukta


They were painted with many thin coats of acrylic paint and given a semi-gloss protective coat of PYMII. Here you can see them being painted.
They look like little aliens!

They stand on a base of heat-cured, responsibly harvested* maple logs covered with dried and treated moss. I had a lot of fun making these and plan to make more in the near future!
Kodama being sculpted!
*Regarding the logs, my Father-In-Law had a huge maple in his back yard that was severely damaged by an unfortunate fire next door. The tree was beyond saving, so he cut it down. He gave the wood to us to use as heating firewood and many, many of the branches are the perfect diameter for these little sculpts!