Ad unit 1

Showing posts with label sculpey. Show all posts

Wednesday, August 19, 2015

Cookie Cat Magnets!

Here are some sweet Cookie Cat magnets! These were inspired by the Cookie Cat ice cream treats that are Steven's favorite treat in Cartoon Network's popular cartoon Steven Universe.

These magnets look good enough to eat!

The magnets are lovingly hand sculpted with durable polymer clay. They are approximately 2" wide x 1.5" tall x 3/8" thick. They are three layers of ice cream cookie goodness!!! I will be bringing these along to the Vermont Comic Con, but they are also available for purchase now for interested parties.
Currently I have 8 of these, but will likely make more if there is a demand. Aren't they just the cutest? Here is the image they are based on:


If you'd like to know more please contact me in the comments, or fill out an order form here.

Friday, April 3, 2015

An unusual egg

In honor of Easter, here is an egg of a different kind! This is another older piece of mine that I happen to particularly enjoy. It actually hangs in my shared office at work and is a great conversation starter. People either love it or hate it, but they are always intrigued. I titled it In the Shell, as it was created for a "special theme" competition. The theme, of course, was shells.

In the Shell, 2004

I have always loved birds and remember becoming fascinated with their eggs when I saw a video of egg candling. What do chicks see in their shells? When do they become aware of their environment? I found it fascinating. This website has a lot of pictures of developing chicken embryos if you'd like to look. It is a little disturbing when you think about the fates of the chickens, but it is interesting in a scientific way. http://www.thepoultrysite.com/articles/1459/embryonic-development-day-by-day/

This piece is mixed media. It consists of Paper Clay and wire mesh (the egg shell itself) Super Sculpey (the chicken and the yolk sack) real goose down, glitter, acrylic paint, and  EnviroTex Lite resin. It is a pretty deep relief sculpture, but has the illusion of greater depth because of the shell's undercut. Here is a profile to show that it does stand out a little from the frame: 


Here are some more detail pics. You can see where I glued on the goose down- I was hoping that it would look more feathery, but when I poured on the resin the feathers became almost transparent. 

The EnviroTex created a nice, liquid look

A close up showing the overhang

I also sprinkled a little glitter into the resin before it cured. I was trying to convey a sense of magic and wonder and the beginning of life, not just 'eww, a chicken embryo.'


It's hard to believe that this piece was made 11 years ago. It is one of the only pieces that I think I want to hold onto :) Happy Easter everyone!

Tuesday, March 24, 2015

A New Kodama Tree

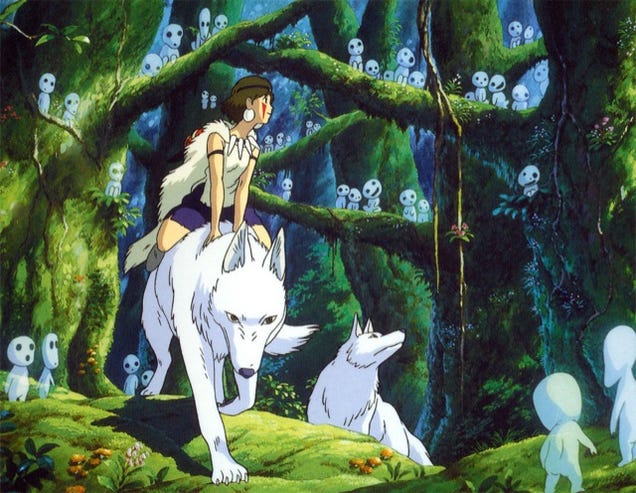
Here is another one of my sculptures inspired by the Hayao Miyazaki masterpiece Princess Mononoke.


This is the second Kodama tree I have made. The design was inspired by this still from the movie:

image credit http://upload.wikimedia.org/wikipedia/en/a/a3/Mononoke_Kodama.jpg
The Kodama are tree spirits who appear throughout the film. They are cute, mysterious, almost creepy, and definitely memorable. Here are some of the little  tree spirits with the titular princess:


This piece was completed on March 19, 2015. The armature is aluminum wire in wood, bulked up with Reynold’s Free Form Sculpt epoxy clay:


Over the epoxy, I affixed a skin of Sculpey III. This time, I made the leafy portions of the tree separately- you can see them in this picture:


I didn’t get a picture of this step, but to make the leaves I use a teardrop-shaped extruder and razor cut a long extruded piece into the leaf shapes. The extruded clay is the green snake you can see in the pictures. I baked the trunk and the leafy tops separately, and then affixed the leaves to the trunk using more of the epoxy clay. You can see my state of the art gluing rig in this photo:

Post-its and Perrer for the win!

After the epoxy cured, I put more Sculpey over the epoxy, then filled in more Sculpey leaves and baked it all again. After baking, I painted the eyes, gave it a wash, and sprayed it 4x with PYM II, an excellent polymer-safe aerosol varnish. 

Overall I am very happy with this piece. I think I will make another- do you think it would look nice in a pot, similar to a bonsai tree? 


Monday, March 23, 2015

Halloween Pumpkins

We may be half a year away from Halloween, but I still thought it would be a good time to show off some of my sculpted pumpkins!
I have always loved carving pumpkins. Some designs are really simple, like this one from several years back:


Others are a little more complex, like this sweet little kitty:


And some are just too much fun to say no to. Need a pumpkin? Why not Zoidberg?


Unfortunately, as we all know a good jack-o-lantern will only last for a week or two before moldy disaster strikes. Therefore, I decided to make some cute sculpted pumpkins! In typical Amy fashion, I barely took any in-progress photos. All of them are sculpted in Apoxie over an aluminum ball. After sculpting I gave them colorful accents and a dark wash to bring out details. Here is a group that's ready for paint!


Here is the group of them once they were painted. this is how I displayed them. They were for sale at the Rock-and-Shock convention in Worcester in 2014.


Someone liked them enough to put them on Instagram!


Oddly enough, this last little guy never sold! He was one of my favorites, too. It's OK though, because I gave him to my good pal Matt and his wife as a Halloween gift. By the way, Matt is an awesome horror author so you should really check him out: https://twitter.com/MattFini


So what do you think, should I make some more for Halloween 2015?? Last but not least, here is a Hero Envy inspired Halloween doodle from my notebook. Too silly.


Thursday, March 19, 2015

A look at the different clays I use

I talk a lot about the products that I use in my sculpture and figure making. Here is a list of some of the products I commonly mention and web sites where you can find them. While the polymer clays from Sculpey are frequently available at Michael’s, A.C. Moore, Hobby Lobby, Wal-Mart and the like, the epoxy-clays are a little more difficult to find. I order them directly from the manufacturer's websites or ebay. 

I find polymer clays to be very much like earth clays. Tools and hands can be cleaned with either mineral / baby oil or alcohol or hand sanitizer with alcohol. Rubbing alcohol also works well to mute finger prints on your work.


Super Sculpey has been my go-to polymer clay for some time now. I find that it has a good blend of detail, strength and flexibility. Here is a spot-on description from their web page:
As with all of our polymer clays, it is easy to condition right out of the package and stays soft until you bake it. Super Sculpey features fine tooling and detailing characteristics, and does not “fill in” after tooling. Because of the fine tooling and detailing characteristics of Super Sculpey, it is frequently the chosen clay for making prototypes from which molds are made from the Super Sculpey sculptures; then reproductions are made using the molds. Additionally, artists are producing finely detailed finished sculptures using Super Sculpey. After curing in the oven, Super Sculpey can be sanded, drilled carved and painted with water-based acrylic paints.http://www.sculpey.com/product/super-sculpey/

I disagree a little with the “staying soft” until you bake it- after a year or so, these blocks will dry out and get rather hard, but they can be reconditioned. I found this Instructable to be very effective for renewing dried out polymer clay http://www.instructables.com/id/How-To-Renew-Dried-Out-Sculpey/. Sure, you could just go buy new clay, but for the artist on a budget (or who just hates throwing stuff like this out) this is a good fix. I used this method to renew a whole poud of the next clay I'm going to discuss.


A similar product that I frequently use is Super Sculpey Firm. It has most of the characteristics of Super Sculpey, but I find that it has less “flow” and will keep its shape better prior to baking. It doesn’t seem to pick up dirt and dust as easily and is slightly more resistant to finger prints. It can very very stiff out of the box and takes a bit of kneading before use. My favorite method of using Super Sculpey Firm is to mix it 50/50 with regular Super Sculpey. Here is the company’s description of Super Sculpey Firm:
Super Sculpey Firm is the answer to many sculptors’ desire for a clay they can carve, tool and detail with none of the blurring and bending found in softer polymer clays. The extra firm sculpting clay is gray in color, making it easy for both sculptors and photographers to see even the tiniest detail and, when necessary, catch it on film. After curing in the oven, Super Sculpey Firm can be sanded, drilled, carved and painted with water-based acrylic paint. http://www.sculpey.com/product/super-sculpey-firm/


When I am not planning on completely painting a sculpture or I am doing something a little less detailed, I use Sculpey III. That’s not to say that Sculpey III doesn’t hold detail- it takes detail very well, in fact. However, I find that color transfers very easily from one shade of Sculpey III to the next, so making a multi-colored piece with a lot of detail is very difficult (if you need to handle it a lot.) It is also relatively expensive so I tend to use it more for little trinkets and figurines.
Sculpey III is the perfect medium for anyone who likes to create. This popular oven bake clay maintains tooling and detailing beautifully. Once cured, Sculpey III bakes hard and takes on a matte, bisque-type finish. It’s easy-to-use and stays soft until you bake it. http://www.sculpey.com/product/sculpey-iii/
Next up are the epoxy clays. These are all 2-part clays that must be mixed in an equal ratio of A:B. I find them easy to work with and clean up. You can use water to smooth surfaces and tools, but you must clean them before they cure. After curing, any residue / left behind will be permanent. Curing time is 2-4 hours, but effective work time averages about 1.5 hours per batch for me. A little hand moisturizing cream works well to keep it from sticking to fingers. I love that they have a 0% shrink rate and are heat resistant, so they are great for reinforcing and building armatures, filling in cracks on polymer pieces and making small features that need to be strong (like ears, noses, and eyes.)


First up is Apoxie Sculpt. This is the first epoxy clay I ever tried. It works well, has a zero shrink rate and is pretty easy to use. I find that it tends to be very soft and will self-level somewhat and not stand up well under its own weight while curing. It is quite putty like. Although it comes in many colors, I have only used the "natural" which is a greenish grey.

Apoxie Sculpt offers economy as well as performance. This 2-part product has a putty-like, smooth consistency, and is easy to mix & use. It is safe and waterproof with 0% shrinkage/cracking! Working time is 2-3 hrs. Cures hard in 24 hrs, and has a semi-gloss finish. Adheres to plastic, resin kits, wood, metal, ceramic, glass, polymers, foam, fiberglass, & more! Can be seamlessly feathered before set-up, or sanded, tapped, drilled, carved, lathed, or otherwise tooled after set-up, without chipping, cracking or flaking! Save time & money on finishing jobs by using Apoxie(R) Sculpt colors. Simple water clean-up or use Aves(R) Safety Solvent. Endless uses for artists, crafters, restorers, modelers, students, and more! Great for creating 3-D graphics and outdoor projects! Available in 12 colors.http://www.apoxie.com/apoxie/apoxie-sculpt

Apoxie Sculpt’s cousin is Fixit Sculpt. It works in a very similar way to Apoxie Sculpt but it is more clay like- uncured pieces will break rather than stretch. It also has a very opaque look to it, doesn’t self-level as much as Apoxie and holds greater detail. 
Repair and Sculpt on a new, exciting level! FIXIT Sculpt is great for many uses that require all of the features and benefits of our traditional FIXIT plus offers exceptional sculpting qualities. It has a firm clay-like feel that resists sagging and drooping; holds detail & impressions. Generous 4 hour working time. Flat matte finish, accepts paints and stains. Great for intricate sculpting work, antler & bone art, ceramic repairs & more! http://www.apoxie.com/fixit-category/fixit-sculpt
 
Picture courtesy of http://www.rednebulastudios.com/

Lastly, I have started using Reynold’s Free Form Sculpt. I won a 5lb supply of this at a convention and I sure am glad that I did! It seems to be somewhere between Apoxie Sculpt and Fixit Sculpt in terms of puttiness, but it is definitely more putty than clay. It is very easy to model, takes detail and is everything you’d expect out of epoxy clay.
Free Form® SCULPT is a two part sculpt-able epoxy clay that requires no firing and will self-cure in a short time to an extremely hard and durable state with virtually no shrinkage. SCULPT is 30% lighter than similar products and holds vertical surfaces better. Users can sculpt larger, stronger pieces with more control over weight distribution. Free Form® SCULPT has an ultra fine particle size that gives the user the ability to sculpt finer detail with better precision using tools or shaping by hand and does not contain crystalline silica (which is a known carcinogen). For added control use Free Form® Detailer.http://www.reynoldsam.com/product/free-form-sculpt/?gclid=CPW6xofrtMQCFRc8gQodPiQADw
So those are the clays I most commonly use! I also use Paper Clay from time to time, but that it rare. Feel free to ask me any questions about these products. Do you have a favorite polymer clay? 


Tuesday, March 10, 2015

Miyazaki figures

I attended last weekend's Camden Comic Con at Rutgers in New Jersey (3/7/15) with Keith Gleason and Matt Herring. What a fun show! It was a one-day show and unlike most of the shows happening this day, it wasn't overrun with celebrities and high-end professional cosplayers. This was a really fan-centered and comic heavy show. Keith and Matt sold their books, Keith's Swamp Tales and Hero Envy and Matt's The Unofficial Doctor Who Companion. They both did well, by all reports.

I had my own merchandise at this show as well: Miyazaki figures! I am a fan of Miyazaki's work and, while I'm not an expert super fan, the characters he designed really speak to me. I whipped up some figures to sell at shows this year based on his creations. The figures themselves are on the small side because I want to keep things at an accessible price for fans and at a reasonable production level for myself.

First up is an army of No-Faces from Spirited Away. These little guys are roughly thumb sized and are solid Sculpey. They are $5 a piece and make perfect desk doo-dads or car companions. They were fun to make.


Next up is Totoro from My Neighbor Totoro. I love this chubby little guy! He is about 4" high and is a Sculpey skin over aluminum foil, epoxy-glued onto a birch base. $20. 


Lastly, I made some Kodoma, the tree spirits from Princess Mononoke. I really enjoyed the repetitive, meditative nature of sculpting and placing all of the leaves. This is about 7" tall and is an aluminum armature, reinforces with Apoxie Sculpt for strength and sculpted with Sculpey. $50. 

I already have some ideas for improving these sculptures. i will be switching from Sculpey brand glaze to a PYM II aerosol polymer-safe varnish.

Friday, March 6, 2015

Swamp Tales figures

Swamp Tales is an awesome comic-strip style comic book written and published by my amazing soon-to-be husband Keith Gleason (we're hoping for a wedding this spring if we can get our act together!) I have done several pieces of art for Swamp Tales but in this post I am going to focus on sculpture. You can read more about Swamp Tales here.

When the first issue of Swamp Tales came out, Keith had an amazing cover drawn by the fantastically versatile Chris Gugliotti.

I just LOVE this illustration!


As you can see, Chris put his own style into the drawing and made it come to life . When I prepared to do some figures of the characters, I wanted to create a synthesis of Chris' drawing and Keith's drawings of the characters. The most notably different is Bucky the Beaver. Slither also has slightly different eyes. You can see the differences if you look at these panels:

So, here is my Bucky in progress. You'll notice that I did give him ears like the one Chris drew, but the nose and head shape is more like Keith's. This pic is interesting as I almost *never* think to take in-progress shots. You can also see some of my supplies in the background (Apoxie Sculpt.) The figure is an aluminum foil and wire armature with joints reinforced by Apoxie Sculpt and a skin of Super Sculpey over it. The paws and tail are also Apoxie.


Here is a close-up of Bucky's finished head. 


Here is the finished sculpture with all three characters. They were all sculpted in a fashion similar to Bucky and painted with acrylic paint. I glued them to a log slice and added some Spanish moss which looks quite nice. I intended to make a sculpted sign but didn't have time, as I was sculpting this for a comic con.

I plan on taking a better pic at some point!

Keep an eye out for more of my Swamp Tales related art in the near future!