Ad unit 1

Monday, July 20, 2015

Groot and Rocket Custom My Little Pony (Guardians of the Galaxy)

Here is a custom My Little Pony based on Groot and Rocket from Marvel's Guardians of the Galaxy!

Here is Rocket posed on Groot's back. He can be moved and repositioned.

Here is Rocket on Groot's head. 

Oh Rocket, you little rascal!

Groot was sculpted with SmoothOn's Free Form Sculpt, a two-part epoxy clay, over a G3 Styling Sized Rarity. Rocket was a McDonald's G3.5 Twilight Sparkle. His gun is an authentic Guardians of the Galaxy rocket launcher repainted for movie accurate colors.

The whole piece is painted with acrylic paint and sealed with PYM II. 

Here is an early stage sculpting pic showing how I created the wood texture. 
There are the containers of Free Form Sculpt next to figures. The whole piece measures 10.5" tall
You can see here how I painted the figure with a black base coat. I had fun with this one!

Friday, June 19, 2015

Golden Pheasant

Here is a painting that I did for a 50th "Golden" anniversary ball. The theme was "gold" so I painted a Golden Pheasant. These gorgrous birds are native to China but are also bred and kept in the US.
coutesy of https://eddietwohawks.files.wordpress.com/2013/10/golden-pheasant-2_11.jpg
I painted this rather quickly- probably in about 8-10 hours. I painted it in acrylic on canvas, then cut the canvas to fit the matt in a frame that was specific to the contest. HEre is the finished painting with some of the other pieces in the competition:

Here is is dring an early stage of completion:


And here is is *very close* to completion:


It is currently hanging in my office at work where I can't get a good completed photograph. i will take a picture and post it here as soon as I can!

Friday, April 3, 2015

An unusual egg

In honor of Easter, here is an egg of a different kind! This is another older piece of mine that I happen to particularly enjoy. It actually hangs in my shared office at work and is a great conversation starter. People either love it or hate it, but they are always intrigued. I titled it In the Shell, as it was created for a "special theme" competition. The theme, of course, was shells.

In the Shell, 2004

I have always loved birds and remember becoming fascinated with their eggs when I saw a video of egg candling. What do chicks see in their shells? When do they become aware of their environment? I found it fascinating. This website has a lot of pictures of developing chicken embryos if you'd like to look. It is a little disturbing when you think about the fates of the chickens, but it is interesting in a scientific way. http://www.thepoultrysite.com/articles/1459/embryonic-development-day-by-day/

This piece is mixed media. It consists of Paper Clay and wire mesh (the egg shell itself) Super Sculpey (the chicken and the yolk sack) real goose down, glitter, acrylic paint, and  EnviroTex Lite resin. It is a pretty deep relief sculpture, but has the illusion of greater depth because of the shell's undercut. Here is a profile to show that it does stand out a little from the frame: 


Here are some more detail pics. You can see where I glued on the goose down- I was hoping that it would look more feathery, but when I poured on the resin the feathers became almost transparent. 

The EnviroTex created a nice, liquid look

A close up showing the overhang

I also sprinkled a little glitter into the resin before it cured. I was trying to convey a sense of magic and wonder and the beginning of life, not just 'eww, a chicken embryo.'


It's hard to believe that this piece was made 11 years ago. It is one of the only pieces that I think I want to hold onto :) Happy Easter everyone!

Tuesday, March 24, 2015

A New Kodama Tree

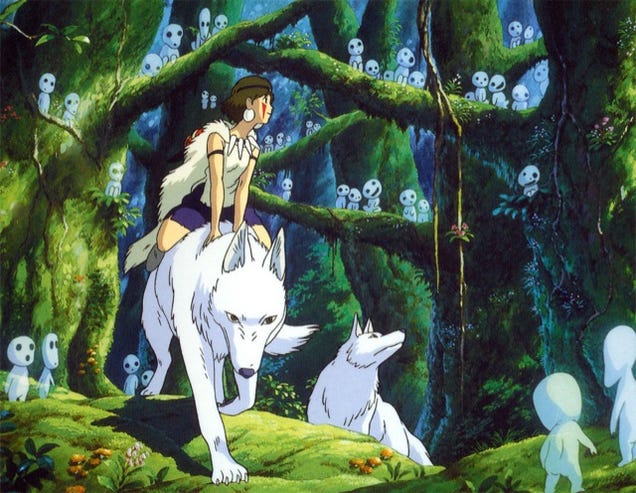
Here is another one of my sculptures inspired by the Hayao Miyazaki masterpiece Princess Mononoke.


This is the second Kodama tree I have made. The design was inspired by this still from the movie:

image credit http://upload.wikimedia.org/wikipedia/en/a/a3/Mononoke_Kodama.jpg
The Kodama are tree spirits who appear throughout the film. They are cute, mysterious, almost creepy, and definitely memorable. Here are some of the little  tree spirits with the titular princess:


This piece was completed on March 19, 2015. The armature is aluminum wire in wood, bulked up with Reynold’s Free Form Sculpt epoxy clay:


Over the epoxy, I affixed a skin of Sculpey III. This time, I made the leafy portions of the tree separately- you can see them in this picture:


I didn’t get a picture of this step, but to make the leaves I use a teardrop-shaped extruder and razor cut a long extruded piece into the leaf shapes. The extruded clay is the green snake you can see in the pictures. I baked the trunk and the leafy tops separately, and then affixed the leaves to the trunk using more of the epoxy clay. You can see my state of the art gluing rig in this photo:

Post-its and Perrer for the win!

After the epoxy cured, I put more Sculpey over the epoxy, then filled in more Sculpey leaves and baked it all again. After baking, I painted the eyes, gave it a wash, and sprayed it 4x with PYM II, an excellent polymer-safe aerosol varnish. 

Overall I am very happy with this piece. I think I will make another- do you think it would look nice in a pot, similar to a bonsai tree? 


Monday, March 23, 2015

Halloween Pumpkins

We may be half a year away from Halloween, but I still thought it would be a good time to show off some of my sculpted pumpkins!
I have always loved carving pumpkins. Some designs are really simple, like this one from several years back:


Others are a little more complex, like this sweet little kitty:


And some are just too much fun to say no to. Need a pumpkin? Why not Zoidberg?


Unfortunately, as we all know a good jack-o-lantern will only last for a week or two before moldy disaster strikes. Therefore, I decided to make some cute sculpted pumpkins! In typical Amy fashion, I barely took any in-progress photos. All of them are sculpted in Apoxie over an aluminum ball. After sculpting I gave them colorful accents and a dark wash to bring out details. Here is a group that's ready for paint!


Here is the group of them once they were painted. this is how I displayed them. They were for sale at the Rock-and-Shock convention in Worcester in 2014.


Someone liked them enough to put them on Instagram!


Oddly enough, this last little guy never sold! He was one of my favorites, too. It's OK though, because I gave him to my good pal Matt and his wife as a Halloween gift. By the way, Matt is an awesome horror author so you should really check him out: https://twitter.com/MattFini


So what do you think, should I make some more for Halloween 2015?? Last but not least, here is a Hero Envy inspired Halloween doodle from my notebook. Too silly.


Sunday, March 22, 2015

Attack on Titan / My Little Pony mash-up!


This is one of my favorite custom My Little Pony creations thus far. For anyone who hasn’t seen  Attack on Titan, it is a Japanese anime (based on a manga) in which the human race has taken refuge within enormous walls, built to protect themselves from enormous man-eating giants (the titular titans.) I enjoyed the first season of the anime, but don’t recommend it for anyone under the age of at least 12, as it is rather violent and gorey.

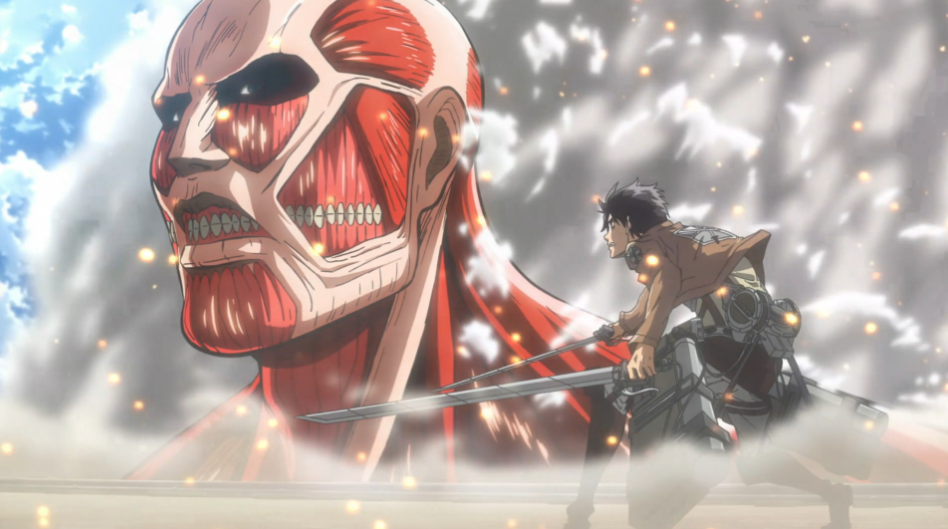
This pony was inspired by one of the more frightening encounters in the series during which our hero Eren Yeager attacks the biggest titan to ever be encountered, the “Colossal Titan.”

Image credit http://operationrainfall.com/wp-content/uploads/2013/05/Attack-on-Titan-Eren-and-Colossal-Titan.png
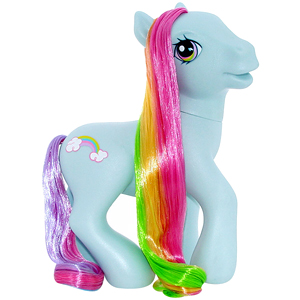
As you can see, the Colossal Titan is a huge and imposing monster! To recreate this character in pony form, I chose one of the Generation 3 “Styling Size” ponies, specifically Rainbow Dash. This is what she would have looked like out of the box:

The pony I used looked no where near as nice as this one. Mine was a frizzy-haired, stained mess! The G3 styling size ponies are a nice, heavy toy that stands up well to any customizing (and play) and is easy to work with. For the Eren figure, I wanted something proportionately smaller, so I went with a Friendship is Magic My Little Pony blind-bag “Apple Jack” figure.

image credit http://i.ebayimg.com/00/s/NjkyWDkyMg==/z/~7sAAOSwq7JT1IrS/$_35.JPG

The Colossal pony’s features were sculpted with Apoxie Sculpt, as it cured to a rock hard material without baking. Lots of people bake custom ponies sculpted with Sculpey, but this never seemed like a good idea to me, and Sculpey is too fragile to stand up to the flex of a vinyl figure beneath it.
Eren’s 3D maneuvering devices were also made of Apoxie Sculpt and I used flattened aluminum wire for his sword blades.
A close up of Eren's gear

Both figures were painted with acrylic paint, and Eren is suspended by vinyl coated copper wire that was drilled and epoxy glued into his back, then fed down into the Colossal’s front leg through a hole in its back.
There is a tiny blood-splash where the wire / spear pierces the titan's shoulder


This pony is for sale, but I do love the attention that it brings to our table at shows! It is a great conversation starter. So many people think it is just a skinned pony (eww!) until we start talking about it. Here are some more pics:


And here is the Colossal pony enjoying his debut at the 2014 Boston Comic Con!

Even this huge crowd couldn't intimidate this titan! ROAR!
Any suggestions for my next giant-sized custom pony? I have about 4 more of the large styling sized ponies laying around! 

Friday, March 20, 2015

An old painting of an old iguana

This is an acrylic on canvas, 24"x36", that I painted in 2004. It's hard to believe that this was dome 11 years ago! It was exhibited at the Leominster Art Association's 39th anual exhibit where it won a the popular vote award, and then at the Fitchburg Art Museum Regional Artists Exhibition where it did not win any awards, but it did sell to an iguana enthusiast.  I used my own photographs of a friend's pet iguana as a reference, along with photographs of iguanas that I found online. Because I used multiple photos rather than drawing from life, the front foot is actually a little small- but don't tell anyone I told you. 


Ultimately, I was *mostly* satisfied with this piece. It is a little stiff, and is really just a study of the animal and textures rather than an emotive painting. If it had not sold, I planned on adding some plants, flowers or foliage to the bottom right hand corner to cover the folds of the leg which, although anatomically correct, look a little strange in my opinion. I used liquitex acrylics with traditional oil-paint handling, with the addition of acrylic glazes for much of the background.

Oh yes, and before it sold, I failed to take a great, high resolution photograph! I need to get better at documenting!