Ad unit 1

Friday, August 21, 2015

Flying Ant Wings

My next My Little Pony custom is going to be Ant-Man with his flying ant "Antony." The custom is still a work in progress, but I have completed the biggest challenge of this project: creating the giant flying ant wings! It took a few tries, but I finally have a pair that will work. 


Creating the wings was a multi-step process. I decided on this method after attempting an older method I had used for fairy wings, a cellophane / trnasparency sandwich method that I used for set #1. The technique looked neat but that didn't look right for this application. 

For these, I used transparency film printed with the actual enlarged image of a flying ant's wings, then a thick gloss dimensional glue/medium on both sides, filling in the spaces between the veins. I then used the same medium to glue a length of black vinyl coated aluminum wire to the edge for stability and attachment purposes, and put a dot of black gloss "3-D" paint on the exposed end of the wire. Then I twisted the small wing and the big wing together, to make a full set of wings.

This is the dimensional glue I used. You can find it at Michael's or a similar store.
Another popular brand that you could try is Diamond Glaze.
 
The difficult part was getting the dimensional medium to self level and dry that way. The trick was to let each section of medium dry before filling in an adjoining section, as it seeks to form a solid mass and you will lose the vein effect of two adjoining areas meet (that was set #2.) The picture below illustrates how I filled in each section and let it dry (the clear parts are dry, the milky parts are just setting.)


 I put set #3 in my car to dry in the heat but oops, my dash is sloped so it pooled at the edges. Set # #4 was drying in the sun on my patio (indirect heat dramatically sped up the dry time which helps when there are so many areas to fill in and wait for before moving on.) Unfortunately, a stiff wind picked the sheet up and stuck it irreparably to my lawn chair. I was finally successful with this set when I worked on it on the patio while weighing it down with rocks! 

Here is the picture of ant wings that I used. It's actually a drawing, and I had to use photoshop to edit out the leg and dramatically darken the veins. the link for the photo (if you'd like to use it) is in the caption below the picture.


http://www.library.illinois.edu/prescons/services/ipm/images/ant_flying_2.JPG

If there are requests, I can make a more in-depth tutorial, but that is the basic process. Now, to finish the ant!

Wednesday, August 19, 2015

Cookie Cat Magnets!

Here are some sweet Cookie Cat magnets! These were inspired by the Cookie Cat ice cream treats that are Steven's favorite treat in Cartoon Network's popular cartoon Steven Universe.

These magnets look good enough to eat!

The magnets are lovingly hand sculpted with durable polymer clay. They are approximately 2" wide x 1.5" tall x 3/8" thick. They are three layers of ice cream cookie goodness!!! I will be bringing these along to the Vermont Comic Con, but they are also available for purchase now for interested parties.
Currently I have 8 of these, but will likely make more if there is a demand. Aren't they just the cutest? Here is the image they are based on:


If you'd like to know more please contact me in the comments, or fill out an order form here.

Wednesday, August 5, 2015

10 Little Kodama

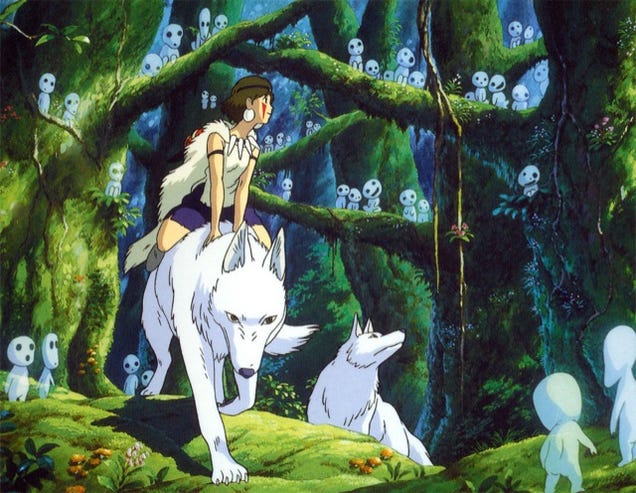
One of my most recent projects has been sculpting some adorable little kodama, inspired by the tree spirits in Hayao Miyazaki's animated masterpiece Princess Monokone. Who wouldn't be inspired by these guys?


I sculpted them with a blend of Sculpey Firm, Super Sculpey and Sculpey III over an aluminum armature. Alone they stand about 3" tall, and their bases are 2"-3". I made 5 this time around, each one with two little tree spirits.

kukta


They were painted with many thin coats of acrylic paint and given a semi-gloss protective coat of PYMII. Here you can see them being painted.
They look like little aliens!

They stand on a base of heat-cured, responsibly harvested* maple logs covered with dried and treated moss. I had a lot of fun making these and plan to make more in the near future!
Kodama being sculpted!
*Regarding the logs, my Father-In-Law had a huge maple in his back yard that was severely damaged by an unfortunate fire next door. The tree was beyond saving, so he cut it down. He gave the wood to us to use as heating firewood and many, many of the branches are the perfect diameter for these little sculpts!

Monday, July 20, 2015

Groot and Rocket Custom My Little Pony (Guardians of the Galaxy)

Here is a custom My Little Pony based on Groot and Rocket from Marvel's Guardians of the Galaxy!

Here is Rocket posed on Groot's back. He can be moved and repositioned.

Here is Rocket on Groot's head. 

Oh Rocket, you little rascal!

Groot was sculpted with SmoothOn's Free Form Sculpt, a two-part epoxy clay, over a G3 Styling Sized Rarity. Rocket was a McDonald's G3.5 Twilight Sparkle. His gun is an authentic Guardians of the Galaxy rocket launcher repainted for movie accurate colors.

The whole piece is painted with acrylic paint and sealed with PYM II. 

Here is an early stage sculpting pic showing how I created the wood texture. 
There are the containers of Free Form Sculpt next to figures. The whole piece measures 10.5" tall
You can see here how I painted the figure with a black base coat. I had fun with this one!

Friday, June 19, 2015

Golden Pheasant

Here is a painting that I did for a 50th "Golden" anniversary ball. The theme was "gold" so I painted a Golden Pheasant. These gorgrous birds are native to China but are also bred and kept in the US.
coutesy of https://eddietwohawks.files.wordpress.com/2013/10/golden-pheasant-2_11.jpg
I painted this rather quickly- probably in about 8-10 hours. I painted it in acrylic on canvas, then cut the canvas to fit the matt in a frame that was specific to the contest. HEre is the finished painting with some of the other pieces in the competition:

Here is is dring an early stage of completion:


And here is is *very close* to completion:


It is currently hanging in my office at work where I can't get a good completed photograph. i will take a picture and post it here as soon as I can!

Friday, April 3, 2015

An unusual egg

In honor of Easter, here is an egg of a different kind! This is another older piece of mine that I happen to particularly enjoy. It actually hangs in my shared office at work and is a great conversation starter. People either love it or hate it, but they are always intrigued. I titled it In the Shell, as it was created for a "special theme" competition. The theme, of course, was shells.

In the Shell, 2004

I have always loved birds and remember becoming fascinated with their eggs when I saw a video of egg candling. What do chicks see in their shells? When do they become aware of their environment? I found it fascinating. This website has a lot of pictures of developing chicken embryos if you'd like to look. It is a little disturbing when you think about the fates of the chickens, but it is interesting in a scientific way. http://www.thepoultrysite.com/articles/1459/embryonic-development-day-by-day/

This piece is mixed media. It consists of Paper Clay and wire mesh (the egg shell itself) Super Sculpey (the chicken and the yolk sack) real goose down, glitter, acrylic paint, and  EnviroTex Lite resin. It is a pretty deep relief sculpture, but has the illusion of greater depth because of the shell's undercut. Here is a profile to show that it does stand out a little from the frame: 


Here are some more detail pics. You can see where I glued on the goose down- I was hoping that it would look more feathery, but when I poured on the resin the feathers became almost transparent. 

The EnviroTex created a nice, liquid look

A close up showing the overhang

I also sprinkled a little glitter into the resin before it cured. I was trying to convey a sense of magic and wonder and the beginning of life, not just 'eww, a chicken embryo.'


It's hard to believe that this piece was made 11 years ago. It is one of the only pieces that I think I want to hold onto :) Happy Easter everyone!

Tuesday, March 24, 2015

A New Kodama Tree

Here is another one of my sculptures inspired by the Hayao Miyazaki masterpiece Princess Mononoke.


This is the second Kodama tree I have made. The design was inspired by this still from the movie:

image credit http://upload.wikimedia.org/wikipedia/en/a/a3/Mononoke_Kodama.jpg
The Kodama are tree spirits who appear throughout the film. They are cute, mysterious, almost creepy, and definitely memorable. Here are some of the little  tree spirits with the titular princess:


This piece was completed on March 19, 2015. The armature is aluminum wire in wood, bulked up with Reynold’s Free Form Sculpt epoxy clay:


Over the epoxy, I affixed a skin of Sculpey III. This time, I made the leafy portions of the tree separately- you can see them in this picture:


I didn’t get a picture of this step, but to make the leaves I use a teardrop-shaped extruder and razor cut a long extruded piece into the leaf shapes. The extruded clay is the green snake you can see in the pictures. I baked the trunk and the leafy tops separately, and then affixed the leaves to the trunk using more of the epoxy clay. You can see my state of the art gluing rig in this photo:

Post-its and Perrer for the win!

After the epoxy cured, I put more Sculpey over the epoxy, then filled in more Sculpey leaves and baked it all again. After baking, I painted the eyes, gave it a wash, and sprayed it 4x with PYM II, an excellent polymer-safe aerosol varnish. 

Overall I am very happy with this piece. I think I will make another- do you think it would look nice in a pot, similar to a bonsai tree?