Ad unit 1

Showing posts with label comics. Show all posts

Wednesday, September 16, 2015

Making Antony, Ant-Man's flying ant!

Inspired by Marvel's "Ant-Man" movie, I decided to make custom pony versions of Ant-Man and his steed, Antony. Although these characters have been in comic books, I chose to model the figures off of the movie versions, as seen here:

These characters are ©Marvel

This project ended up being rather complicated! Antony started life as a very shabby looking 2005 Styling Size Rainbow Dash My Little Pony, very similar to this one:
It's interesting how much Rainbow Dash has changed over the years!
One of the first big challenges was giving her six legs. Although that's not completely necessary for a custom like this (for example, I have seen many butterfly custom ponies with only four legs) I really wanted to make this pony as ant-like as possible. Since Hasbro has long stopped the production of this model, there is a finite supply of G3 Styling Sized figures in the world. Therefore, rather than chopping up another pony just for the legs, I decided to fabricate them from scratch. 


I began by drilling holes into the sides of the pony, feeding a length of coat hanger wire through the pony and securing it with epoxy. I then used aluminum foil to build up the bulk of the legs, and covered them with a skin of Smooth-On's Free Form Sculpt epoxy clay. 


The large abdomen area was done in a very similar fashion.  Free-Form Sculpt tends to slump a little when used over large areas, so I needed to sand the pony quite a bit to get a nice smooth finish on the legs. 

I like to sand outside when I can. Talk about proper ventilation!

There was also a bit of experimentation in this piece. I toyed with the idea of sculpting segments into the legs, to give it a real insect look. The effect wasn't what I had hoped for, so I ended up scratching the idea. This led to more patching and re-sanding, but experimenting is part of the fun!

The sculpted joints that I ended up taking off. 
I added pincers to the mouth and segmented antennae to the forehead, both using a similar method to the attachment for the wings, except that the antennae are removable to shipping purposes. As a cool feature, the saddle on the back has a magnet built into it that will allow Ant-Man to cling to the saddle (I will demonstrate this in a later post!) I nearly forgot to take a picture before I started painting...

Here you can see the rescultping and sanding I did on the joints of the legs.
The painting process consisted of many, many coats of thin acrylic paint. I use multiple coats to minimize brush strokes (there aren't really any) and get the smoothest possible finish. Here you can see the dark brown base coat in process:


Normally, I would have liked to have used an airbrush for this paint job. However, after moving a few years ago, I still can't find my airbrush. It was an extremely cheap Badger brush though, and I might have thrown it away in clogged frustration. Instead, I did the paint job with many, many layers of soft bristle brush blending, using combinations of black, dark brown, yellow ochre and Naples yellow.
About 3/4 of the paint job is finished in this picture.
As you can see, I chose to create the look of a segmented body using paint. I think that this is a better pony/insect hybrid look, and am pretty pleased with the finished result.

The wings are what really makes a flying ant a flying ant, and the wings for this bad boy were no easy feat! I already featured my process in this blog post. Here is a picture of the wings:

Funny observation: I modeled these wings off of actual flying ant wings.
However, in the film, it looks like they used a dragonfly wing pattern. 
In all (the sculpting, painting and wing manking) probably took 20 hours of work. It is now finished, and I will be posting a picture of the finished Antony with his Ant-Man passenger soon! Please let me know if you have any comments or questions!

Friday, August 21, 2015

Flying Ant Wings

My next My Little Pony custom is going to be Ant-Man with his flying ant "Antony." The custom is still a work in progress, but I have completed the biggest challenge of this project: creating the giant flying ant wings! It took a few tries, but I finally have a pair that will work. 


Creating the wings was a multi-step process. I decided on this method after attempting an older method I had used for fairy wings, a cellophane / trnasparency sandwich method that I used for set #1. The technique looked neat but that didn't look right for this application. 

For these, I used transparency film printed with the actual enlarged image of a flying ant's wings, then a thick gloss dimensional glue/medium on both sides, filling in the spaces between the veins. I then used the same medium to glue a length of black vinyl coated aluminum wire to the edge for stability and attachment purposes, and put a dot of black gloss "3-D" paint on the exposed end of the wire. Then I twisted the small wing and the big wing together, to make a full set of wings.

This is the dimensional glue I used. You can find it at Michael's or a similar store.
Another popular brand that you could try is Diamond Glaze.
 
The difficult part was getting the dimensional medium to self level and dry that way. The trick was to let each section of medium dry before filling in an adjoining section, as it seeks to form a solid mass and you will lose the vein effect of two adjoining areas meet (that was set #2.) The picture below illustrates how I filled in each section and let it dry (the clear parts are dry, the milky parts are just setting.)


 I put set #3 in my car to dry in the heat but oops, my dash is sloped so it pooled at the edges. Set # #4 was drying in the sun on my patio (indirect heat dramatically sped up the dry time which helps when there are so many areas to fill in and wait for before moving on.) Unfortunately, a stiff wind picked the sheet up and stuck it irreparably to my lawn chair. I was finally successful with this set when I worked on it on the patio while weighing it down with rocks! 

Here is the picture of ant wings that I used. It's actually a drawing, and I had to use photoshop to edit out the leg and dramatically darken the veins. the link for the photo (if you'd like to use it) is in the caption below the picture.


http://www.library.illinois.edu/prescons/services/ipm/images/ant_flying_2.JPG

If there are requests, I can make a more in-depth tutorial, but that is the basic process. Now, to finish the ant!

Wednesday, August 5, 2015

10 Little Kodama

One of my most recent projects has been sculpting some adorable little kodama, inspired by the tree spirits in Hayao Miyazaki's animated masterpiece Princess Monokone. Who wouldn't be inspired by these guys?


I sculpted them with a blend of Sculpey Firm, Super Sculpey and Sculpey III over an aluminum armature. Alone they stand about 3" tall, and their bases are 2"-3". I made 5 this time around, each one with two little tree spirits.

kukta


They were painted with many thin coats of acrylic paint and given a semi-gloss protective coat of PYMII. Here you can see them being painted.
They look like little aliens!

They stand on a base of heat-cured, responsibly harvested* maple logs covered with dried and treated moss. I had a lot of fun making these and plan to make more in the near future!
Kodama being sculpted!
*Regarding the logs, my Father-In-Law had a huge maple in his back yard that was severely damaged by an unfortunate fire next door. The tree was beyond saving, so he cut it down. He gave the wood to us to use as heating firewood and many, many of the branches are the perfect diameter for these little sculpts!

Monday, July 20, 2015

Groot and Rocket Custom My Little Pony (Guardians of the Galaxy)

Here is a custom My Little Pony based on Groot and Rocket from Marvel's Guardians of the Galaxy!

Here is Rocket posed on Groot's back. He can be moved and repositioned.

Here is Rocket on Groot's head. 

Oh Rocket, you little rascal!

Groot was sculpted with SmoothOn's Free Form Sculpt, a two-part epoxy clay, over a G3 Styling Sized Rarity. Rocket was a McDonald's G3.5 Twilight Sparkle. His gun is an authentic Guardians of the Galaxy rocket launcher repainted for movie accurate colors.

The whole piece is painted with acrylic paint and sealed with PYM II. 

Here is an early stage sculpting pic showing how I created the wood texture. 
There are the containers of Free Form Sculpt next to figures. The whole piece measures 10.5" tall
You can see here how I painted the figure with a black base coat. I had fun with this one!

Sunday, March 22, 2015

Attack on Titan / My Little Pony mash-up!


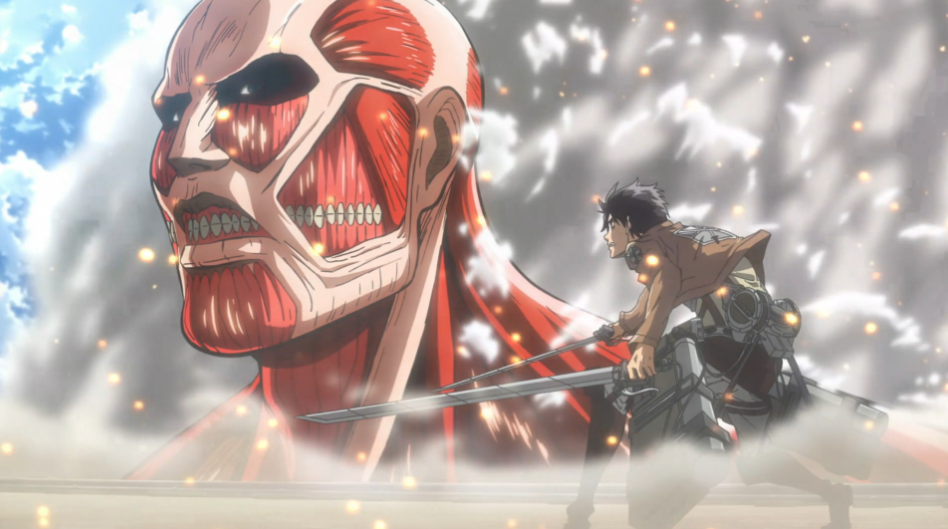
This is one of my favorite custom My Little Pony creations thus far. For anyone who hasn’t seen  Attack on Titan, it is a Japanese anime (based on a manga) in which the human race has taken refuge within enormous walls, built to protect themselves from enormous man-eating giants (the titular titans.) I enjoyed the first season of the anime, but don’t recommend it for anyone under the age of at least 12, as it is rather violent and gorey.

This pony was inspired by one of the more frightening encounters in the series during which our hero Eren Yeager attacks the biggest titan to ever be encountered, the “Colossal Titan.”

Image credit http://operationrainfall.com/wp-content/uploads/2013/05/Attack-on-Titan-Eren-and-Colossal-Titan.png
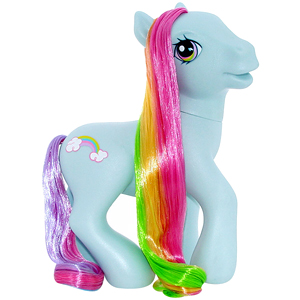
As you can see, the Colossal Titan is a huge and imposing monster! To recreate this character in pony form, I chose one of the Generation 3 “Styling Size” ponies, specifically Rainbow Dash. This is what she would have looked like out of the box:

The pony I used looked no where near as nice as this one. Mine was a frizzy-haired, stained mess! The G3 styling size ponies are a nice, heavy toy that stands up well to any customizing (and play) and is easy to work with. For the Eren figure, I wanted something proportionately smaller, so I went with a Friendship is Magic My Little Pony blind-bag “Apple Jack” figure.

image credit http://i.ebayimg.com/00/s/NjkyWDkyMg==/z/~7sAAOSwq7JT1IrS/$_35.JPG

The Colossal pony’s features were sculpted with Apoxie Sculpt, as it cured to a rock hard material without baking. Lots of people bake custom ponies sculpted with Sculpey, but this never seemed like a good idea to me, and Sculpey is too fragile to stand up to the flex of a vinyl figure beneath it.
Eren’s 3D maneuvering devices were also made of Apoxie Sculpt and I used flattened aluminum wire for his sword blades.
A close up of Eren's gear

Both figures were painted with acrylic paint, and Eren is suspended by vinyl coated copper wire that was drilled and epoxy glued into his back, then fed down into the Colossal’s front leg through a hole in its back.
There is a tiny blood-splash where the wire / spear pierces the titan's shoulder


This pony is for sale, but I do love the attention that it brings to our table at shows! It is a great conversation starter. So many people think it is just a skinned pony (eww!) until we start talking about it. Here are some more pics:


And here is the Colossal pony enjoying his debut at the 2014 Boston Comic Con!

Even this huge crowd couldn't intimidate this titan! ROAR!
Any suggestions for my next giant-sized custom pony? I have about 4 more of the large styling sized ponies laying around! 

Monday, March 16, 2015

Custom My Little Ponies: How-to, progress pictures!

These two ponies I'll share are not actually new. What makes them interesting is that I actually took some pictures of my work as I went! This isn't really a how-to, but it will give you an idea of some of the steps I took in completing these projects.

The first one I'll share is my Purgatori custom from 2008. Here she is again, finished:

Lovely little thing, she is


And here are some progress shots. You'll see that I was mainly focusing on the wings and how I put them together. They are basically a wire mesh glued to thin aluminium wire, which was fed through holes in the shoulders and down into each leg. So the weight of the wings is supported all the way down into the feet.


Here you can really see the sculpting and the nice way that Apoxie Sculpt blends into the vinyl of the pony. Note the wire at the base of the wing.


 You can also see that I haven't added the hair yet- that is always the last thing to do: rehairing. No fangs yet either.


In this last shot you can see how I have filled in the wing membrane and started to add the "finger" bones to each wing. The fingers are sculpted onto both the front and the back. 

And voila! Isn't she lovely? 

Nest up is a restoration and customization of a really sad looking G1 Twilight Sparkle. This was for a contest at the MLP Area. First up, lets take a look at this sad girl. Reports are that the family dog used her for a chew toy. 


Ouch! That doesn't look too good. Twilight Sparkle was a So-Soft flocked pony, so the first step was to remove the flocking, which was easily wiped away with acetone. This removed the paint as well. 


Her head didn't look too good, either. I cut all of her hair off then used pliers to pull the plugs out from the inside. 

First thing this girl needed was some ears, I used Apoxie Sculpt to form a new ear tip for her left ear and to fill in the hole and build an ear on the left. The damage was close to her eye, so the brow had to be rebuilt as well. She also had a little nick on her upper lip. 


In the background you can see a bottle of mint hand lotion. Hand lotion (any scent) is great for keeping Apoxie from sticking to your skin. 

After her head was repaired, I rebuilt her missing leg and her dinged back foot. The blue tape and spool are to help her keep her rearing pose while the Apoxie cured. 


That's it for the progress pictures, unfortunately. Since I wanted to keep the rearing pose I decided to give her a long flowing skirt. She was completely sculpted with Apoxie Sculpt and re-haired with Nylon hair. 


As you can see, the repairs blended seamlessly with the original body. Overall, I was very pleased with this piece.