Ad unit 1

Tuesday, March 24, 2015

A New Kodama Tree

Here is another one of my sculptures inspired by the Hayao Miyazaki masterpiece Princess Mononoke.


This is the second Kodama tree I have made. The design was inspired by this still from the movie:

image credit http://upload.wikimedia.org/wikipedia/en/a/a3/Mononoke_Kodama.jpg
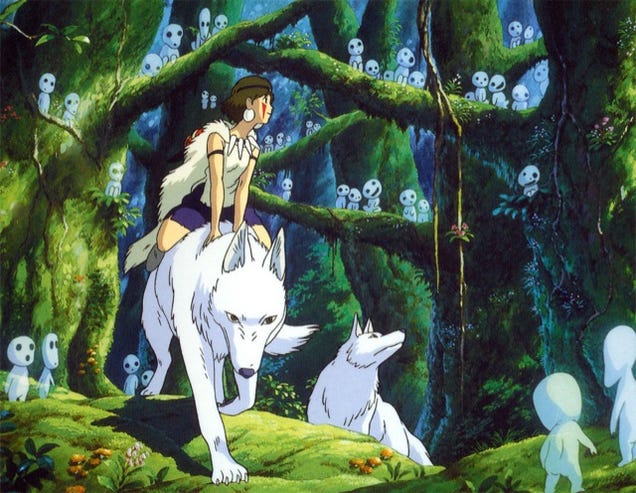
The Kodama are tree spirits who appear throughout the film. They are cute, mysterious, almost creepy, and definitely memorable. Here are some of the little  tree spirits with the titular princess:


This piece was completed on March 19, 2015. The armature is aluminum wire in wood, bulked up with Reynold’s Free Form Sculpt epoxy clay:


Over the epoxy, I affixed a skin of Sculpey III. This time, I made the leafy portions of the tree separately- you can see them in this picture:


I didn’t get a picture of this step, but to make the leaves I use a teardrop-shaped extruder and razor cut a long extruded piece into the leaf shapes. The extruded clay is the green snake you can see in the pictures. I baked the trunk and the leafy tops separately, and then affixed the leaves to the trunk using more of the epoxy clay. You can see my state of the art gluing rig in this photo:

Post-its and Perrer for the win!

After the epoxy cured, I put more Sculpey over the epoxy, then filled in more Sculpey leaves and baked it all again. After baking, I painted the eyes, gave it a wash, and sprayed it 4x with PYM II, an excellent polymer-safe aerosol varnish. 

Overall I am very happy with this piece. I think I will make another- do you think it would look nice in a pot, similar to a bonsai tree? 


Monday, March 23, 2015

Halloween Pumpkins

We may be half a year away from Halloween, but I still thought it would be a good time to show off some of my sculpted pumpkins!
I have always loved carving pumpkins. Some designs are really simple, like this one from several years back:


Others are a little more complex, like this sweet little kitty:


And some are just too much fun to say no to. Need a pumpkin? Why not Zoidberg?


Unfortunately, as we all know a good jack-o-lantern will only last for a week or two before moldy disaster strikes. Therefore, I decided to make some cute sculpted pumpkins! In typical Amy fashion, I barely took any in-progress photos. All of them are sculpted in Apoxie over an aluminum ball. After sculpting I gave them colorful accents and a dark wash to bring out details. Here is a group that's ready for paint!


Here is the group of them once they were painted. this is how I displayed them. They were for sale at the Rock-and-Shock convention in Worcester in 2014.


Someone liked them enough to put them on Instagram!


Oddly enough, this last little guy never sold! He was one of my favorites, too. It's OK though, because I gave him to my good pal Matt and his wife as a Halloween gift. By the way, Matt is an awesome horror author so you should really check him out: https://twitter.com/MattFini


So what do you think, should I make some more for Halloween 2015?? Last but not least, here is a Hero Envy inspired Halloween doodle from my notebook. Too silly.


Sunday, March 22, 2015

Attack on Titan / My Little Pony mash-up!


This is one of my favorite custom My Little Pony creations thus far. For anyone who hasn’t seen  Attack on Titan, it is a Japanese anime (based on a manga) in which the human race has taken refuge within enormous walls, built to protect themselves from enormous man-eating giants (the titular titans.) I enjoyed the first season of the anime, but don’t recommend it for anyone under the age of at least 12, as it is rather violent and gorey.

This pony was inspired by one of the more frightening encounters in the series during which our hero Eren Yeager attacks the biggest titan to ever be encountered, the “Colossal Titan.”

Image credit http://operationrainfall.com/wp-content/uploads/2013/05/Attack-on-Titan-Eren-and-Colossal-Titan.png
As you can see, the Colossal Titan is a huge and imposing monster! To recreate this character in pony form, I chose one of the Generation 3 “Styling Size” ponies, specifically Rainbow Dash. This is what she would have looked like out of the box:

The pony I used looked no where near as nice as this one. Mine was a frizzy-haired, stained mess! The G3 styling size ponies are a nice, heavy toy that stands up well to any customizing (and play) and is easy to work with. For the Eren figure, I wanted something proportionately smaller, so I went with a Friendship is Magic My Little Pony blind-bag “Apple Jack” figure.

image credit http://i.ebayimg.com/00/s/NjkyWDkyMg==/z/~7sAAOSwq7JT1IrS/$_35.JPG

The Colossal pony’s features were sculpted with Apoxie Sculpt, as it cured to a rock hard material without baking. Lots of people bake custom ponies sculpted with Sculpey, but this never seemed like a good idea to me, and Sculpey is too fragile to stand up to the flex of a vinyl figure beneath it.
Eren’s 3D maneuvering devices were also made of Apoxie Sculpt and I used flattened aluminum wire for his sword blades.
A close up of Eren's gear

Both figures were painted with acrylic paint, and Eren is suspended by vinyl coated copper wire that was drilled and epoxy glued into his back, then fed down into the Colossal’s front leg through a hole in its back.
There is a tiny blood-splash where the wire / spear pierces the titan's shoulder


This pony is for sale, but I do love the attention that it brings to our table at shows! It is a great conversation starter. So many people think it is just a skinned pony (eww!) until we start talking about it. Here are some more pics:


And here is the Colossal pony enjoying his debut at the 2014 Boston Comic Con!

Even this huge crowd couldn't intimidate this titan! ROAR!
Any suggestions for my next giant-sized custom pony? I have about 4 more of the large styling sized ponies laying around! 

Friday, March 20, 2015

An old painting of an old iguana

This is an acrylic on canvas, 24"x36", that I painted in 2004. It's hard to believe that this was dome 11 years ago! It was exhibited at the Leominster Art Association's 39th anual exhibit where it won a the popular vote award, and then at the Fitchburg Art Museum Regional Artists Exhibition where it did not win any awards, but it did sell to an iguana enthusiast.  I used my own photographs of a friend's pet iguana as a reference, along with photographs of iguanas that I found online. Because I used multiple photos rather than drawing from life, the front foot is actually a little small- but don't tell anyone I told you. 


Ultimately, I was *mostly* satisfied with this piece. It is a little stiff, and is really just a study of the animal and textures rather than an emotive painting. If it had not sold, I planned on adding some plants, flowers or foliage to the bottom right hand corner to cover the folds of the leg which, although anatomically correct, look a little strange in my opinion. I used liquitex acrylics with traditional oil-paint handling, with the addition of acrylic glazes for much of the background.

Oh yes, and before it sold, I failed to take a great, high resolution photograph! I need to get better at documenting!


Thursday, March 19, 2015

A look at the different clays I use

I talk a lot about the products that I use in my sculpture and figure making. Here is a list of some of the products I commonly mention and web sites where you can find them. While the polymer clays from Sculpey are frequently available at Michael’s, A.C. Moore, Hobby Lobby, Wal-Mart and the like, the epoxy-clays are a little more difficult to find. I order them directly from the manufacturer's websites or ebay. 

I find polymer clays to be very much like earth clays. Tools and hands can be cleaned with either mineral / baby oil or alcohol or hand sanitizer with alcohol. Rubbing alcohol also works well to mute finger prints on your work.


Super Sculpey has been my go-to polymer clay for some time now. I find that it has a good blend of detail, strength and flexibility. Here is a spot-on description from their web page:
As with all of our polymer clays, it is easy to condition right out of the package and stays soft until you bake it. Super Sculpey features fine tooling and detailing characteristics, and does not “fill in” after tooling. Because of the fine tooling and detailing characteristics of Super Sculpey, it is frequently the chosen clay for making prototypes from which molds are made from the Super Sculpey sculptures; then reproductions are made using the molds. Additionally, artists are producing finely detailed finished sculptures using Super Sculpey. After curing in the oven, Super Sculpey can be sanded, drilled carved and painted with water-based acrylic paints.http://www.sculpey.com/product/super-sculpey/

I disagree a little with the “staying soft” until you bake it- after a year or so, these blocks will dry out and get rather hard, but they can be reconditioned. I found this Instructable to be very effective for renewing dried out polymer clay http://www.instructables.com/id/How-To-Renew-Dried-Out-Sculpey/. Sure, you could just go buy new clay, but for the artist on a budget (or who just hates throwing stuff like this out) this is a good fix. I used this method to renew a whole poud of the next clay I'm going to discuss.


A similar product that I frequently use is Super Sculpey Firm. It has most of the characteristics of Super Sculpey, but I find that it has less “flow” and will keep its shape better prior to baking. It doesn’t seem to pick up dirt and dust as easily and is slightly more resistant to finger prints. It can very very stiff out of the box and takes a bit of kneading before use. My favorite method of using Super Sculpey Firm is to mix it 50/50 with regular Super Sculpey. Here is the company’s description of Super Sculpey Firm:
Super Sculpey Firm is the answer to many sculptors’ desire for a clay they can carve, tool and detail with none of the blurring and bending found in softer polymer clays. The extra firm sculpting clay is gray in color, making it easy for both sculptors and photographers to see even the tiniest detail and, when necessary, catch it on film. After curing in the oven, Super Sculpey Firm can be sanded, drilled, carved and painted with water-based acrylic paint. http://www.sculpey.com/product/super-sculpey-firm/


When I am not planning on completely painting a sculpture or I am doing something a little less detailed, I use Sculpey III. That’s not to say that Sculpey III doesn’t hold detail- it takes detail very well, in fact. However, I find that color transfers very easily from one shade of Sculpey III to the next, so making a multi-colored piece with a lot of detail is very difficult (if you need to handle it a lot.) It is also relatively expensive so I tend to use it more for little trinkets and figurines.
Sculpey III is the perfect medium for anyone who likes to create. This popular oven bake clay maintains tooling and detailing beautifully. Once cured, Sculpey III bakes hard and takes on a matte, bisque-type finish. It’s easy-to-use and stays soft until you bake it. http://www.sculpey.com/product/sculpey-iii/
Next up are the epoxy clays. These are all 2-part clays that must be mixed in an equal ratio of A:B. I find them easy to work with and clean up. You can use water to smooth surfaces and tools, but you must clean them before they cure. After curing, any residue / left behind will be permanent. Curing time is 2-4 hours, but effective work time averages about 1.5 hours per batch for me. A little hand moisturizing cream works well to keep it from sticking to fingers. I love that they have a 0% shrink rate and are heat resistant, so they are great for reinforcing and building armatures, filling in cracks on polymer pieces and making small features that need to be strong (like ears, noses, and eyes.)


First up is Apoxie Sculpt. This is the first epoxy clay I ever tried. It works well, has a zero shrink rate and is pretty easy to use. I find that it tends to be very soft and will self-level somewhat and not stand up well under its own weight while curing. It is quite putty like. Although it comes in many colors, I have only used the "natural" which is a greenish grey.

Apoxie Sculpt offers economy as well as performance. This 2-part product has a putty-like, smooth consistency, and is easy to mix & use. It is safe and waterproof with 0% shrinkage/cracking! Working time is 2-3 hrs. Cures hard in 24 hrs, and has a semi-gloss finish. Adheres to plastic, resin kits, wood, metal, ceramic, glass, polymers, foam, fiberglass, & more! Can be seamlessly feathered before set-up, or sanded, tapped, drilled, carved, lathed, or otherwise tooled after set-up, without chipping, cracking or flaking! Save time & money on finishing jobs by using Apoxie(R) Sculpt colors. Simple water clean-up or use Aves(R) Safety Solvent. Endless uses for artists, crafters, restorers, modelers, students, and more! Great for creating 3-D graphics and outdoor projects! Available in 12 colors.http://www.apoxie.com/apoxie/apoxie-sculpt

Apoxie Sculpt’s cousin is Fixit Sculpt. It works in a very similar way to Apoxie Sculpt but it is more clay like- uncured pieces will break rather than stretch. It also has a very opaque look to it, doesn’t self-level as much as Apoxie and holds greater detail. 
Repair and Sculpt on a new, exciting level! FIXIT Sculpt is great for many uses that require all of the features and benefits of our traditional FIXIT plus offers exceptional sculpting qualities. It has a firm clay-like feel that resists sagging and drooping; holds detail & impressions. Generous 4 hour working time. Flat matte finish, accepts paints and stains. Great for intricate sculpting work, antler & bone art, ceramic repairs & more! http://www.apoxie.com/fixit-category/fixit-sculpt
 
Picture courtesy of http://www.rednebulastudios.com/

Lastly, I have started using Reynold’s Free Form Sculpt. I won a 5lb supply of this at a convention and I sure am glad that I did! It seems to be somewhere between Apoxie Sculpt and Fixit Sculpt in terms of puttiness, but it is definitely more putty than clay. It is very easy to model, takes detail and is everything you’d expect out of epoxy clay.
Free Form® SCULPT is a two part sculpt-able epoxy clay that requires no firing and will self-cure in a short time to an extremely hard and durable state with virtually no shrinkage. SCULPT is 30% lighter than similar products and holds vertical surfaces better. Users can sculpt larger, stronger pieces with more control over weight distribution. Free Form® SCULPT has an ultra fine particle size that gives the user the ability to sculpt finer detail with better precision using tools or shaping by hand and does not contain crystalline silica (which is a known carcinogen). For added control use Free Form® Detailer.http://www.reynoldsam.com/product/free-form-sculpt/?gclid=CPW6xofrtMQCFRc8gQodPiQADw
So those are the clays I most commonly use! I also use Paper Clay from time to time, but that it rare. Feel free to ask me any questions about these products. Do you have a favorite polymer clay? 


Wednesday, March 18, 2015

Angry Birds Pony

This is just a quick post to share a little custom I made in 2011. She was made from a FiM Styling Sized pony and was a pretty straight-forward re-hair and repaint. No sculpting here!


The hair is mostly black with streaks of red, yellow and blue (the colors of the main bird characters) and she has a green ribbon to match her pig cutie mark. 

Tuesday, March 17, 2015

Mexican inspiration

I have always loved the folk art of Mexico. The bright colors and clever patterns have always caught my eye and inspired me. This piece was an attempt to emulate the folk art of Mexico while including my own ideas, styling and elements. It is a mixed-media shadow box and is approximately 10"x10" square and 2.5" deep. It was sculpted with Sculpey and Apoxie clays and painted in acrylics.

In the center, there is a jaguar and a quetzalcoatl. I am not an expert on Aztec religion or culture, nor would I ever pretend to be, but when I was making this I was reading about  Tezcatlipoca  and Quetzalcoatl who are sometimes depicted as rivals, and how Tezcatlipoca was associated with the jaguar. Thus, I presented the two figures together in a sort of yin-and0yang presentation.

Around them is a box with leaves, and surrounding the box are small sculpted sugar skulls. I was a bit obsessed with Dia de los Muertos art at the time, so I had a lot of fun painting all the little skulls.
Unfortunately, I didn't take many angled pictures, but inside the box is a valley, with a night time starry sky, sun setting behind mountains and green grass with two rivers, On the left and right sides are a female and male dancing skeleton, respectively. The front is decorated with patterns of flowers, crosses and dots. I know that the outside edges are painted too, but I don't remember with what! It is difficult to see in the photos, but all of the patterns on the coatl and jaguar are incised into the clay. This piece was made in 2010 and given as a wedding gift to a friend.

A detail of the jaguar:

Monday, March 16, 2015

Custom My Little Ponies: How-to, progress pictures!

These two ponies I'll share are not actually new. What makes them interesting is that I actually took some pictures of my work as I went! This isn't really a how-to, but it will give you an idea of some of the steps I took in completing these projects.

The first one I'll share is my Purgatori custom from 2008. Here she is again, finished:

Lovely little thing, she is


And here are some progress shots. You'll see that I was mainly focusing on the wings and how I put them together. They are basically a wire mesh glued to thin aluminium wire, which was fed through holes in the shoulders and down into each leg. So the weight of the wings is supported all the way down into the feet.


Here you can really see the sculpting and the nice way that Apoxie Sculpt blends into the vinyl of the pony. Note the wire at the base of the wing.


 You can also see that I haven't added the hair yet- that is always the last thing to do: rehairing. No fangs yet either.


In this last shot you can see how I have filled in the wing membrane and started to add the "finger" bones to each wing. The fingers are sculpted onto both the front and the back. 

And voila! Isn't she lovely? 

Nest up is a restoration and customization of a really sad looking G1 Twilight Sparkle. This was for a contest at the MLP Area. First up, lets take a look at this sad girl. Reports are that the family dog used her for a chew toy. 


Ouch! That doesn't look too good. Twilight Sparkle was a So-Soft flocked pony, so the first step was to remove the flocking, which was easily wiped away with acetone. This removed the paint as well. 


Her head didn't look too good, either. I cut all of her hair off then used pliers to pull the plugs out from the inside. 

First thing this girl needed was some ears, I used Apoxie Sculpt to form a new ear tip for her left ear and to fill in the hole and build an ear on the left. The damage was close to her eye, so the brow had to be rebuilt as well. She also had a little nick on her upper lip. 


In the background you can see a bottle of mint hand lotion. Hand lotion (any scent) is great for keeping Apoxie from sticking to your skin. 

After her head was repaired, I rebuilt her missing leg and her dinged back foot. The blue tape and spool are to help her keep her rearing pose while the Apoxie cured. 


That's it for the progress pictures, unfortunately. Since I wanted to keep the rearing pose I decided to give her a long flowing skirt. She was completely sculpted with Apoxie Sculpt and re-haired with Nylon hair. 


As you can see, the repairs blended seamlessly with the original body. Overall, I was very pleased with this piece.